

To make your CapCut-edited videos even more exciting, you can try using CapCut’s effects.
Navigating CapCut’s effects can initially seem overwhelming due to the sheer number of options, but once you know where to look, it becomes a powerful tool for enhancing your videos.

Find effects in the Cap Cut app on your phone.
- Open the project and select a clip on the timeline.
- Locate the “Effects” icon in the bottom toolbar.
Tapping it will reveal categories like Video Effects, Body Effects, and Photo Effects.
- Select “Video Effects” to browse different effect sets, categorized by theme.
- You can simply tap an effect to apply it to the selected clip.
Its duration will appear as a bar on the timeline, which you can extend or shorten by dragging the ends.
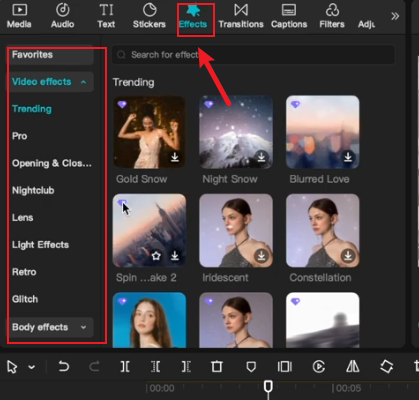
Find effects on Capcut PC
- Open the project and select a clip on the timeline.
- View the “Effects” tab in the top left corner of the screen.
- Clicking it will display a library of effects, often with categories listed on the left.
- Drag and drop the effect directly onto the clip in the timeline.
Using the CapCut effect search and the CapCut effects template
Make good use of the search function. If you know the name of a specific effect or want to explore a style, the search function can save you time.
If you have a preferred style, you can directly use the same effects as other people.
- Effect Search:
Both the mobile and desktop versions have a search bar, usually represented by a magnifying glass icon. within the Effects panel. This is the fastest way to find something specific.
- Templates:
Templates are a fantastic way to apply a complex combination of effects, transitions, and music instantly. Instead of the Effects tab, go to the Templates section from the main screen. You can browse trending templates or search for keywords like “cinematic,” “viral,” or “aesthetic”. Some templates are even linked directly from TikTok, allowing you to replicate popular trends with your own clips.
How To Import Effects In Capcut Pc?
CapCut allows you to go beyond built-in effects by importing your own resources for a unique look.
- On Desktop:
The PC version supports importing LUTs (Look-Up Tables). You can import .cube files through the color adjustment tools to apply a consistent color style across your video.
- Using Overlays:
For effects like green screen, you use the Overlay tool. Tap “Add overlay,” select your green screen video or image, and then use the Chroma Key effect (found in the Video Effects menu) to remove the green background. Alternatively, you can refer to the articles on our website to learn how to add a green screen.
Suggestions for better results
To make the most of CapCut’s effects, you can try the following operations.
Adjust Intensity:
After applying an effect, look for an Adjust or similar option to control its intensity. Adjusting the video to suit its specific style can yield better results.
Where to find effects in CapCut free:
Click to download CapCut Modded from the homepage. You can get all the CapCut effects templates for free. No subscription required, no extra steps needed, all special effects included.
Performance:
Complex effects like high levels of stabilization, glow, or blur can increase rendering times. Please use it according to your own situation.
Frequently Asked Questions
Q: Can I import effects on the CapCut PC version?
A: Yes, primarily for color grading via LUT files (.cube format). The process for other custom effects often involves using the overlay track.
Q: What’s the difference between “Effects” and “Filters”?
A: Generally, Filters are for overall color and tone adjustments, while Effects create visual changes like motion, light, distortion, or stylistic changes.
Have you learned how to use the CapCut effects template?
Utilize CapCut effect search to find specific templates, select different effects based on the different styles of the video, and skillfully adjust the intensity using enhancement features.
I hope this guide helps you navigate CapCut’s creative toolkit with confidence!


