

If you want to make your videos more engaging, learning how to edit CapCut grafik can be really helpful. On CapCut PC, you can easily insert charts and graphs, adjust their colors, labels, and animation styles, and even combine them with other visual elements like text or stickers. By exploring the graph editing options and customizing them to fit your video’s style, you can create professional-looking content that clearly communicates data or trends without overwhelming viewers. Small adjustments, like changing the graph layout or adding smooth transitions, can make a big difference in presentation quality.
1. Understanding Graphs in CapCut
On CapCut PC, “graphs” usually refer to visual representations of data, such as bar charts, line charts, or simple diagrams. These graphs can help show numbers, trends, or comparisons clearly in a video. Unlike regular images, graphs are designed to present information quickly and make it easier for viewers to understand.
When learning to make a CapCut graphs edit tutorial, you’ll discover that there are two main ways to include visual data in your videos: importing graphs from programs like Excel or Google Sheets as images, which works well for precise or complex data, and using CapCut’s built-in charts and shapes to create simple bar graphs, line graphs, or visual highlights directly within the app, making it easy to enhance your video without relying on external tools.
Understanding the type of graph you need before starting is important. For example:
- Bar charts work well to compare numbers between categories.
- Line charts are good for showing changes over time.
- Pie charts can show percentages or parts of a whole.
Understanding how to visualize data is essential when creating content, and CapCut mod apk for Windows can be a helpful tool for editing videos that include graphs. Knowing your graph type helps you plan how it will appear in your video and how viewers will understand the information. Choosing the right type not only makes your video look professional but also keeps the audience engaged throughout.
2. Preparing Your Graphs
Before adding a graph to CapCut, you need to have the data ready. You can use Excel, Google Sheets, or any other program to create a chart. Once the chart is ready, you can save it as an image to import it into CapCut.
Some tips for preparing graphs:
- Make the text clear and easy to read.
- Use colors that contrast well to show differences.
- Keep the design simple; too much detail can be hard to see in a video.
3. Importing Graphs into CapCut PC
Once you have your graph image:
- Open CapCut on your PC.
- Create a new project or open an existing one.
- Click the Import button and select the graph image from your computer.
- Drag the image to the timeline where you want it to appear.
At this stage, your graph is ready to be edited like any other image in CapCut.
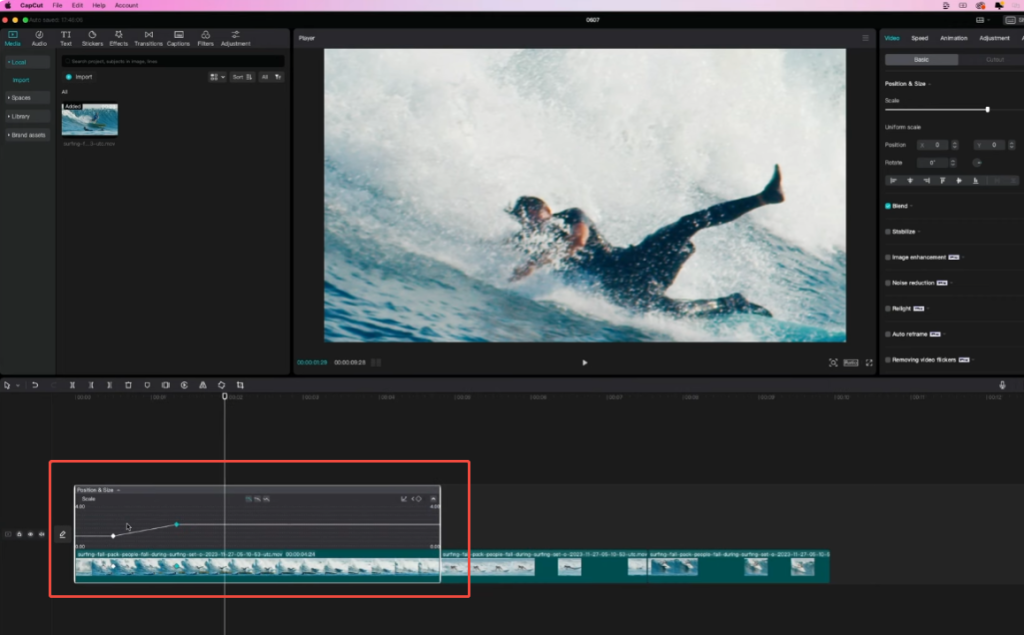
4. Editing Graphs
After importing, you can make several changes:
Resize and Position
You can change the size of your graph and move it around the screen. This helps fit the graph into the video layout and makes sure viewers can see it clearly.
Add Text and Labels
You can add text labels to explain parts of your graph. For example, you can label the X-axis and Y-axis, add numbers, or include short notes. CapCut allows you to choose font, color, and animation for the text.
Apply Animation
Animations can make graphs more interesting. You can make a graph appear gradually, zoom in on certain parts, or highlight bars or points. This helps viewers focus on important data while keeping the video dynamic.
Add Effects
CapCut offers basic effects like shadows, outlines, and filters. Adding a slight effect can make the graph look cleaner and easier to read. Be careful not to overuse effects, as this can distract from the data.
5. Timing Graphs in the Timeline
Once your graph is added to CapCut, controlling how long it appears on screen is very important. In most videos, graphs are only needed for a short period, just enough for viewers to understand the data. CapCut allows you to adjust the length of the graph clip directly in the timeline.
To change the timing:
- Drag the ends of the graph clip to make it appear longer or shorter. This is useful if you want the graph to match your narration or music.
- Split the clip if you want to show the graph in sections. For example, a bar chart could appear one bar at a time to explain changes step by step.
- Use transitions or fade-ins to make the graph appear smoothly, instead of popping on the screen suddenly. This helps maintain a professional look.
Timing is also important if you have multiple graphs. You can layer them or set them to appear one after another, making your video easier to follow. Proper timing ensures that viewers have enough time to read the graph without feeling rushed, while keeping the video engaging.
6. Exporting Your Video
Once you finish editing the graph:
- Check the video to make sure the graph is clear and readable.
- Make sure the timing matches your narration or background music.
- Click Export and choose the video format and quality.
The exported video will include the graph exactly as you arranged it in CapCut.
7. Tips for Better Graph Videos
Creating clear and engaging graph videos takes a little planning. Here are some ways to make your graphs easier to understand and more visually appealing:
- Use consistent colors: Assign specific colors to certain data points, bars, or lines. This makes it easier for viewers to recognize patterns quickly. For example, always use blue for one category and red for another.
- Keep text short and readable: Avoid long sentences or small fonts. Use short labels, numbers, or single words to explain the data. This prevents the graph from looking cluttered and makes it easier for viewers to follow along.
- Highlight important points: If your graph shows a trend or change, use animation, arrows, or text to emphasize it. You can make a bar grow slowly or add a glow effect to a specific line. This draws attention to key information without overwhelming the audience.
- Check timing with narration or music: Make sure the graph appears long enough for viewers to read all the labels and understand the data. If you have narration, sync the graph appearance with what you’re explaining.
- Test on different screen sizes: Your audience may watch videos on phones, tablets, or computers. Make sure your text and graphics are readable on small screens as well as larger ones.
- Keep designs simple: Avoid adding too many effects, bright colors, or extra shapes that distract from the data. Simplicity makes the graph look professional and ensures the information is clear.
- Use multiple views if needed: For complex data, consider breaking the graph into several shorter clips instead of showing everything at once. This makes it easier for viewers to follow the changes step by step.
Final Tips for Editing Graphs
Editing graphs on CapCut PC is simple once you understand the basics, and if you want to fine-tune motion or timing, learning how to edit keyframe graphs on CapCut PC can really elevate your video. By carefully preparing your data, importing clear graph visuals, and combining CapCut’s tools for text, animation, and effects, you can create smooth, professional-looking transitions that make your content more engaging without overwhelming your audience.
Always check your timing in the timeline, keep text short, and use colors consistently. Highlight key points with animation or labels so viewers can quickly understand the data. Practicing these steps will make your graph videos look professional and easy to follow.
With these tips, you can turn any data into a clear visual story that fits well in your CapCut videos.


