

Whether it’s traffic sounds, fan hum, wind interference, or people chatting in the background, unwanted noise can completely undermine your video’s professionalism. Fortunately, CapCut’s powerful built-in tools can easily solve these audio problems.
In this comprehensive guide, I’ll walk you through everything you need to know about enabling noise reduction, mastering audio editing, and making your audio sound clean and professional.
How to Enable Noise Reduction on CapCut?
CapCut offers noise reduction across all its platforms—mobile, desktop, and web versions. The process varies slightly between platforms, but the core functionality remains consistent.
Mobile Version
The mobile app provides the most accessible noise reduction feature for creators on the go.
Step:
- Open CapCut and create a new project or open an existing one containing your noisy video.
- Import your video clip by tapping “New Project” and selecting the video from your photo library.
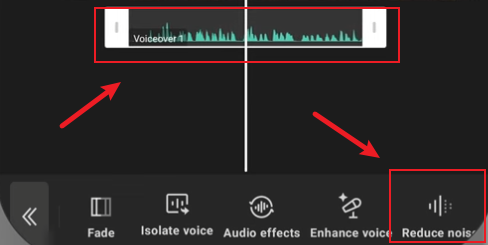
- Access the audio tools by tapping on your video clip in the timeline. A menu will appear at the bottom of the screen.
- Swipe through the bottom menu options until you find “Audio” or “Sound” tools.
- Locate the “Noise Reduction” option—it typically appears as a small wave or sound line icon.
- Adjust the slider to your preferred level. I recommend starting around 40% for optimal results that eliminate background noise without making your voice sound unnatural.
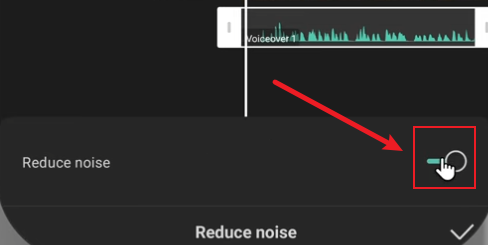
- Preview your changes by playing the video. If noise persists, increase the slider slightly.
- Consider enabling “Voice Enhancer” alongside noise reduction for richer, more professional-sounding audio.
- Export your video once satisfied with the audio quality.
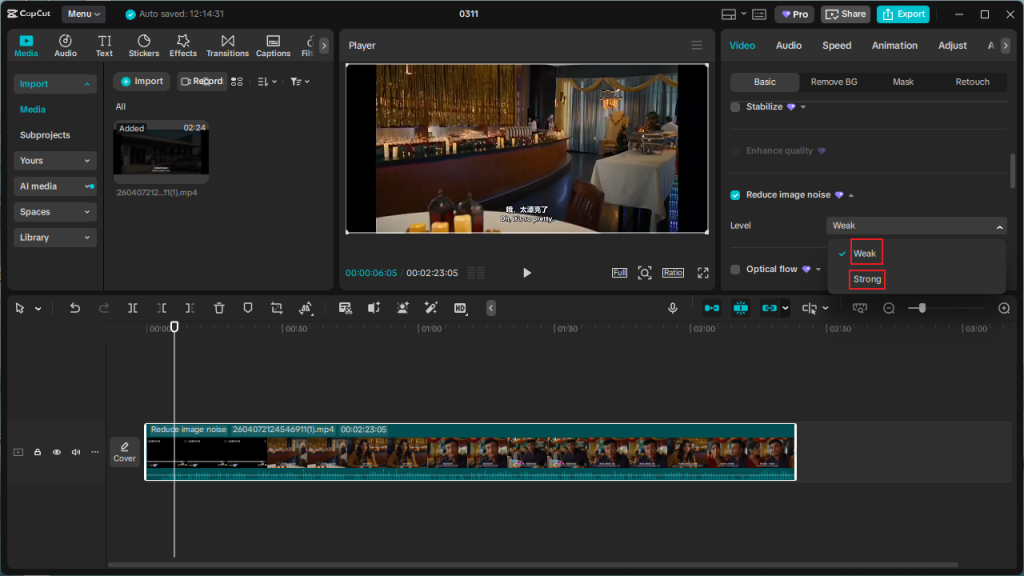
Desktop Version
For those editing on computers, CapCut Desktop offers more precise control over noise reduction:
Step:
- Create a new project by clicking “New Project”.
- Import your video by dragging it into the media panel or using the Import button.
- Drag the video to your timeline and select it to open the control panel.
- Navigate to the “Audio” tab in the settings panel.
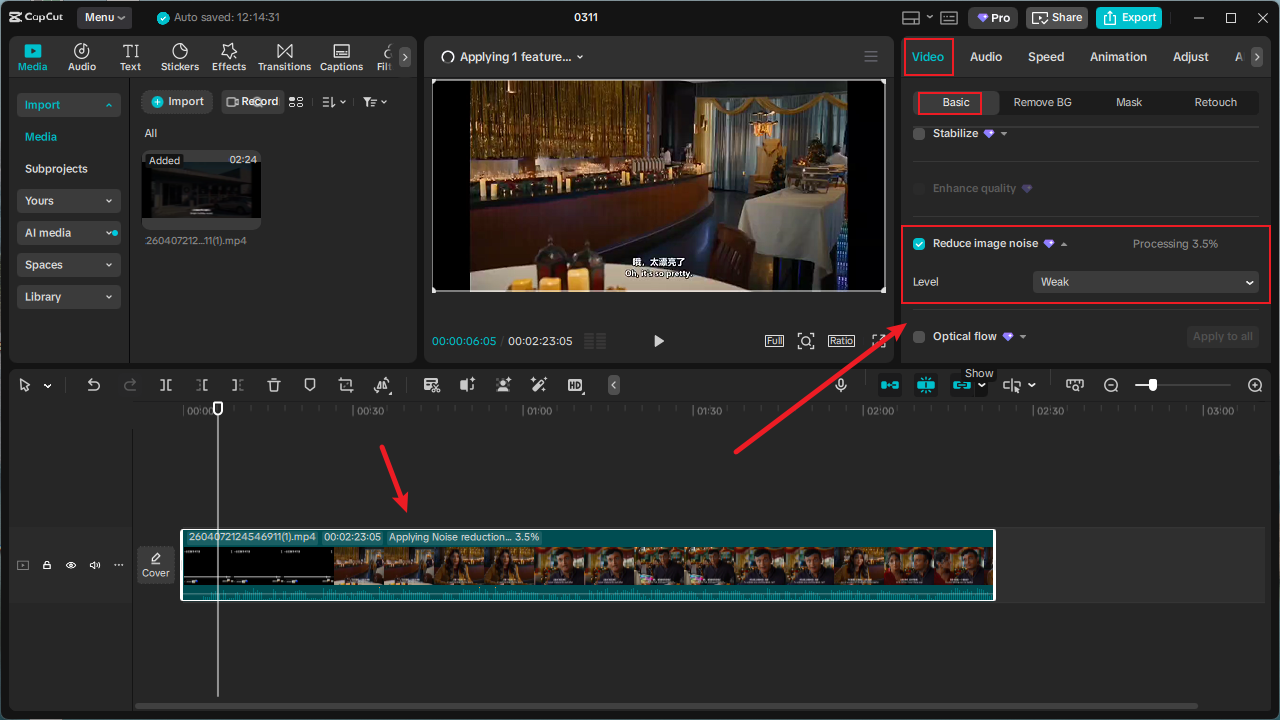
- Enable “Noise Reduction” or “Reduce Noise” by toggling the switch.
- Preview the audio to ensure it sounds natural and clear.
- Export your video with your preferred resolution and format settings.
Why Your Audio Sounds Noisy?
Your audio carries emotion, clarity, and professionalism. When background noise competes with your voice or main audio track, viewers struggle to focus on your message, reducing engagement and retention rates.
The most common noise culprits include:
- Environmental noise: Traffic, construction, wind, rain
- Electronic interference: Fan hum, computer noise, electrical buzzing
- Room acoustics: Echo, reverb from hard surfaces
- Recording equipment issues: Microphone hiss, low-quality recording devices
How to Edit Audio on CapCut?
While CapCut noise effect reduction is essential, it offers a comprehensive suite of audio editing tools that can transform your videos from amateur to professional quality.
Extracting and Separating Audio
Sometimes you need to work with audio separately from your video.
- Tap on your video clip in the timeline.
- Scroll through the bottom menu options and select “Extract Audio”.
- This creates a separate audio track that you can edit independently, applying effects like noise reduction, volume adjustments, and more.
Volume Adjustment and Normalization
Consistent audio levels are crucial for professional videos:
- Volume sliders: Adjust overall volume levels for individual clips
- Keyframe animation: Create dynamic volume changes throughout your video
- Normalization: Automatically balance audio levels across different clips
Voice Enhancement Features
CapCut includes several tools specifically designed to improve vocal quality:
- Voice Enhancer: Adds richness and clarity to spoken audio
- EQ adjustments: Fine-tune frequency response for different voice types
- Compression: Smooth out volume variations in speech
Adding Background Music and Sound Effects
Music and sound effects can dramatically enhance your video’s emotional impact:
- Access the audio library through the “Audio” tab.
- Browse categories like trending, mood-based, or genre-specific tracks.
- Adjust music volume to complement rather than compete with your main audio.
- Use fade-ins and fade-outs for smooth transitions.
Voiceover Recording and Editing
For tutorials, narrations, or vlogs, CapCut’s voiceover capabilities are impressive:
- In-app recording: Record directly within CapCut with visual synchronization
- External audio import: Bring in professionally recorded audio files
- Timeline synchronization: Precisely align voiceovers with visual elements
- Editing tools: Cut, trim, and adjust the timing of voice recordings
Pro Tips to Get Cleaner Audio
Want next-level audio? Fix it at the source:
- Record closer to the microphone
- Use a lavalier mic if possible
- Avoid windy environments
- Record in quiet rooms
- Turn off fans or AC temporarily
Editing helps, but good recording saves you hours later.
FAQ
Why is my audio still noisy after using CapCut?
Because noise reduction isn’t perfect. If the noise is too loud or overlaps with your voice, it can’t be fully removed.
Some features of CapCut require a subscription. Are there any alternatives?
Yes, you can download CapCut Mod APK Premium and CapCut for PC Mod APK. All premium features are free to use. It’s an alternative to the paid CapCut.
What is the best volume level for background music?
With voices present, typically 10-20% volume works well. If there is no voice, the background music can be increased appropriately.
Why do we only notice some noise issues after exporting?
Sometimes focusing on video editing can cause you to overlook some mistakes. Using headphones before you export can help you hear small details and check your audio more effectively.
Final Thoughts: Is CapCut Good Enough for Audio Editing?
While CapCut isn’t a dedicated audio workstation like Adobe Audition, it offers robust enough tools for professional voiceover editing. The combination of noise reduction, volume normalization, EQ adjustments, and compression effects allows you to achieve broadcast-quality audio.
The free Capcut for PC mod APK lets you create whatever you want without worrying about subscription fees. If you’re making content for social media, it’s honestly one of the easiest ways to clean up your audio without overthinking it.


