

How to Create Smooth Keyframes in CapCut PC
Keyframes are essential for creating dynamic effects in videos, but improperly adjusted keyframes often result in stiff or unnatural motion. Smoothing keyframes is the secret to achieving fluid animation. CapCut PC offers some basic yet effective tools that, when used correctly, can make animations flow more seamlessly. This guide details a step-by-step method for creating smooth keyframes in CapCut PC, covering the entire process from basic curve adjustments to advanced techniques.
What are keyframes in CapCut PC?
Keyframes define the starting and ending values of properties such as position, scale, rotation, or opacity. Smooth keyframes refers to transitions between two keyframes in an animation following a natural velocity curve, avoiding abrupt jumps or mechanically uniform motion. Smooth keyframes simulate real-world physics, using subtle acceleration and deceleration to make camera pans, object slides, or zoom effects appear natural and fluid.
Smooth keyframes are effective for:
-
Eye-catching yet organic animations in social media shorts (TikTok/Reels).
-
Marketing videos with refined transition effects.
-
Any project requiring professional motion design to elevate storytelling.
Completing Basic Keyframe Setup in CapCut PC
Before smoothing keyframes, ensure basic keyframes are correctly set—initial errors often cause unexpected stuttering. Quick steps:
1. Import clips into CapCut PC and drag them onto the timeline. Select clips to activate the right-side editing panel.
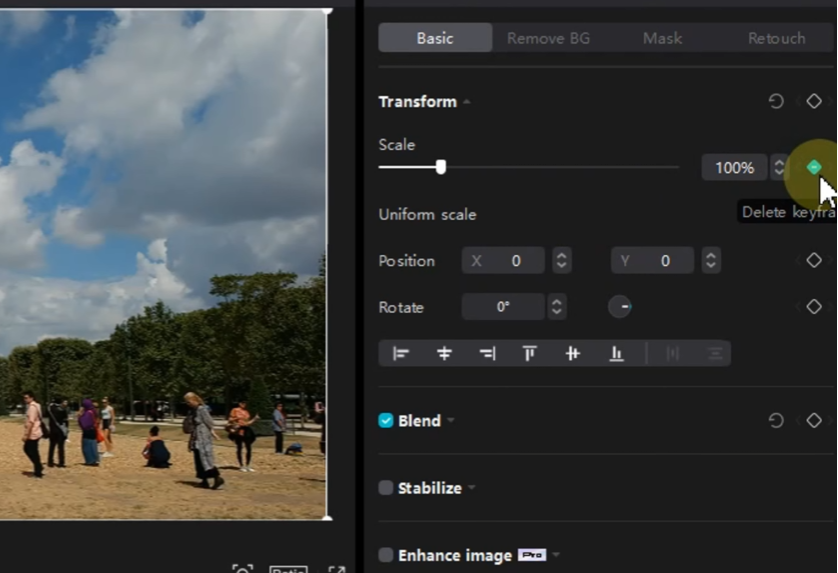
2. Move the playhead to the animation’s starting point. Click the “Add Keyframe” button next to “Transform” in the right panel to set the initial keyframe.
3. Adjust the clip’s state at this keyframe.
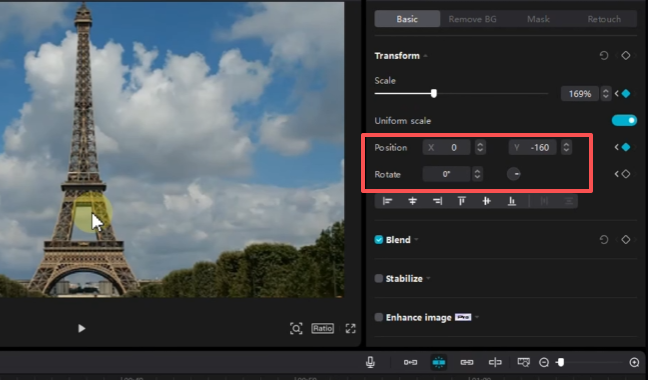
4. Move the playhead to the animation’s ending point. CapCut will automatically add a second keyframe as you adjust the clip’s state.
5. Preview the animation effect. If the motion appears jerky or unnatural, continue using the following method to smooth it out.
How to Smooth Keyframes Using Curves
CapCut PC’s keyframe curve editor is the core tool for achieving smooth animation effects. It supports customizing speed transitions between keyframes, offering both preset curves and manual curve modes. Follow these steps:
Step 1: Open the Keyframe Curve Panel
- Select the clip containing keyframes on the timeline
- Right-click any keyframe point on the timeline Choose “Show Keyframe Curve”.
- A curve panel will appear below the timeline, displaying four parameter curves: Position (X/Y), Scale, and Rotation—each curve controls the animation effect for a specific parameter.
Step 2: Select the appropriate curve type
Click a keyframe to select it—curve options will appear to adjust transition effects. CapCut offers four core curve types for different smoothing needs:
- 1. Linear Curve: Creates uniform, constant-speed motion. Suitable for simple, steady actions, though dynamic effects may appear stiff. Select the keyframe and click the “Linear” icon in the curve panel.
- 2. Auto Curve: Generates symmetrical arcs between keyframes to simulate natural acceleration and deceleration. This is the simplest way to achieve smooth transitions. Select the keyframe and click “Auto Curve”—drag the small “handles” on the curve to adjust the speed range: drag up/down to change speed intensity, drag left/right to expand the transition range.
- 3. Preset Curves: CapCut includes built-in preset curves for common effects. Click the preset dropdown menu in the curve panel and select options like “Ease In” or “Ease Out” to instantly apply smooth transitions.
- 4. Free Curve: For complete control, draw custom curves. Click “Free Curve” and drag control points to create unique speed patterns. This feature is ideal for precisely matching animation rhythms to music beats.
Step 3: Optimizing Curves for Multi-Parameter Animations
When animating multiple parameters, ensure their curves remain synchronized: Expand each parameter curve (X/Y position, scale) in the Curves panel. Apply consistent curve types to prevent disjointed motion. Adjust control handle lengths uniformly—short handles create tight transitions, while long handles produce gradual changes.
Advanced Techniques for Enhancing Keyframe Smoothness
1. Add Intermediate Keyframes
Long intervals between keyframes often cause jerky motion. Insert intermediate frames between two keyframes to break down movement into smoother segments.
Move the playhead between two existing keyframes. Fine-tune the clip’s position or scale, then click “Add Keyframe.” Apply an auto curve to the new keyframe to generate a gradual, multi-stage motion.
2. Utilize Motion Blur
Motion blur simulates the blurring effect of real-world motion, masking subtle inconsistencies between keyframes. Enable it by:
Selecting the clip Navigating to the “Effects” panel on the right Searching for “Motion Blur”. Adjust the “Intensity” slider to synchronize blur duration with keyframe transitions, increasing intensity during accelerated motion.
3. Master Curve Presets for Specific Scenarios
Apply specialized curve techniques to match diverse animation contexts:
-
Waterfall Curve: A gentle downward arc creates smooth slow-motion transitions, ideal for landscapes or close-ups.
-
Bullet Curve: Sharp peaks followed by gradual decay suit explosive actions like action sequences.
-
V-Shaped Curve: Slow rise rapid peak gradual fall perfectly showcases product detail shots.
4. Audio-Synchronized Keyframes
Align keyframe transitions with music beats or sound effects to enhance visual fluidity.
Enable the “Beat Detection” feature in the “Audio” tab to mark music beats on the timeline. Place keyframes at beat markers and use short curve handles to achieve compact, rhythmic transitions.
Common Issues and Solutions for Smoothing Keyframes
Issue 1: Curve adjustments not taking effect
Solution: Ensure the correct keyframes are selected before adjusting curves. Verify the parameter linked to the curve panel is accurate (e.g., X position instead of Y position). Update CapCut PC to the latest version—older versions may contain curve editor bugs.
Issue 2: Smooth Preview but Stuttering After Export
Solution: Optimize export settings: Set frame rate to 30/60fps matching your project, and bitrate to “High.” Avoid overloading project layers/effects—merge clips before export to simplify structure. Clear CapCut cache to fix rendering failures.
Issue 3: “Jitter” in Keyframe Motion
Solution: Reduce keyframe density—excessive keyframes cause jerky motion; aim for 3-5 keyframes per 5 seconds of animation. Beginners should prioritize Auto Curves over Free Curves for adjustments. Ensure clip resolution matches project settings.
Export Settings for Smoothness
Even the smoothest keyframes can distort with improper export settings. Follow these guidelines:
Click “Export” Set resolution to 1080p/4K matching source footage. Set frame rate to 30fps or 60fps. Select “MP4” format with ‘High’ bitrate. Avoid “Quick Export” mode, which compresses footage and may degrade animation fluidity.
FAQs
Q: Can I copy a smooth keyframe curve to other clips?
A: Yes. Right-click the keyframe containing the target curve Select “Copy Keyframe” Right-click the target clip’s timeline Select “Paste Keyframe”. The curve settings will be copied.
Q: Is there a shortcut to reset keyframe curves?
A: Right-click the keyframe Select “Reset Curve” to restore linear motion.
Q: How do I specifically smooth rotation keyframes?
A: Expand the “Rotation” line in the Curve panel, apply Auto Curve, then adjust the control handles to control rotation speed—longer handles produce smoother rotation, while shorter handles yield faster rotation.


