

CapCut is a popular video editing application known for its ease of use and powerful features. Many users find one feature particularly useful: the ability to categorize and organize materials into different material libraries. As time goes on and you create more and more projects, you may want to move various materials, such as video clips, audio files, images, or presets to another library to keep them organized and easily accessible. However, this operation is sometimes not so intuitive, especially when you are also trying to learn capcut how to apply preset settings across different folders to maintain a consistent aesthetic for your brand. In this article, we will demonstrate step by step how to move footage to another media library in CapCut.
What Are CapCut Libraries?
CapCut Media Library is a folder used to store and organize the media files you use in your project, ensuring that once you complete your CapCut download free and start creating, all your video clips, audio files, images, and special effects are easily accessible. By organizing various materials into different media libraries, you can keep your projects organized and make it much easier to manage throughout the editing process.
Each media library helps you categorize and store your materials according to specific categories, such as project type or content type. This makes it easier for you to find the materials you need without having to search through a huge number of files one by one.
A media library is especially useful when you are working on multiple projects at the same time, as it ensures that your media materials are organized and avoids confusion. With the media library feature, CapCut users can not only save time but also significantly improve workflow efficiency.
Why Move Materials to a Different Library?
Migrating footage to different media libraries in CapCut is an excellent way to keep things organized and optimize your workflow. As editing projects increase, piling all the footage in one place often leads to chaos and disorganization, which in turn slows down your work efficiency. Many creators looking to elevate their production value choose to download the CapCut Premium APK to access advanced assets and limitless storage options, further emphasizing why you should consider migrating your materials to a different material library to maintain a professional, streamlined editing environment:
1. Better Organization
Over time, as you accumulate more and more video footage, audio files, and images, your initial media library may become too cluttered and overwhelming. By creating separate media libraries for different projects or content types, you can quickly find the materials you need. For example, you can create one media library specifically for storing media files for a particular project, and another media library for storing general resources such as stock videos or sound effects. This hierarchical archiving and organization method can make your editing process smoother and more efficient.
2. Managing Large Amounts of Media
If you are working on multiple projects at the same time, or if a project is large and contains a huge amount of video clips and footage, then a single library will quickly run out of storage space. Migrating some files to a new repository helps to manage storage space more effectively. For example, you can store older video clips in a separate library, while keeping only footage from currently active projects in the main library. This not only makes it easier for you to manage your phone’s storage space but also ensures that applications run smoothly.
3. Separation of Personal and Project Media
If you use CapCut for both personal and professional projects, storing media materials separately helps avoid mixing personal and work assets. Organizing project materials into specific material libraries dedicated to each project ensures that your personal photos, music, or videos are not mixed up with work files. This not only helps eliminate clutter but also allows you to focus more on editing tasks.
4. Improved Collaboration
If you are collaborating with others on a project, moving materials to different repositories can help share resources in a more organized way. You can create a shared library where all collaborators can access the same set of media materials, while keeping individual work or drafts in separate libraries. This approach makes it easier for the team to stay organized and collaborate more efficiently, particularly when you need to share large files or reusable assets.
How to Move Materials in CapCut
Currently, CapCut does not offer a built-in function to move footage from one media library to another with a single click. There is an alternative method that can help you achieve this goal. Here are the steps:
Step 1: Export Materials to a New Library
- Open CapCut and go to the library where your materials are stored.
- Find the materials, such as videos, images, and audio files, that you want to move.
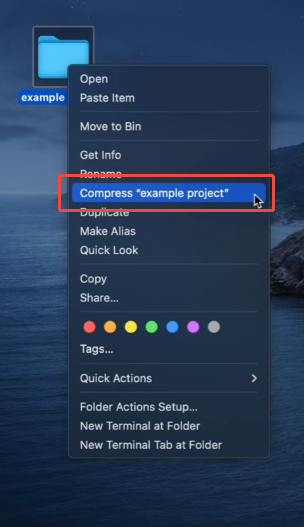
- Export the materials one by one to your device’s storage.
Step 2: Create a New Library
Once you’ve exported your materials, you can create a new library to store them in:
- Go to the “Library” section in CapCut.
- Tap on Create New Library.
- Name the library according to your preference.
Step 3: Import Materials into the New Library
- Go to the new library you just created.
- Import the exported materials by tapping the import button.
- Select the files you previously saved from your phone’s storage and import them into the new library.
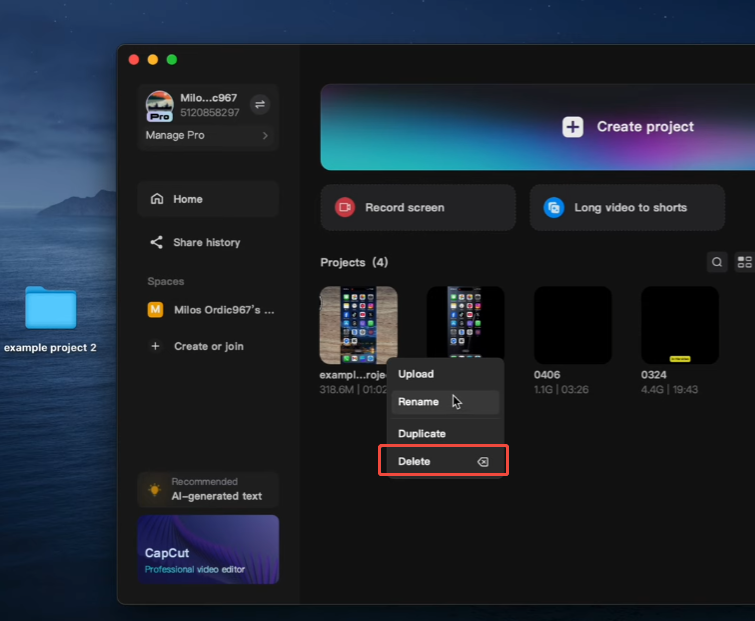
Step 4: Delete Materials from the Original Library
If you want to completely move the materials and don’t need them in the original library anymore:
- Go back to the original library.
- Select the materials you want to remove.
- Delete or archive the items.
Step 5: Organize and Manage Libraries
Now that the materials have been imported into the new media library, you can start organizing them according to your own needs. CapCut allows you to tag, group, and sort content for easier searching and retrieval. Now is the perfect time to clean up redundant files and keep your media library clean and streamlined.
Tips for Managing Libraries in CapCut
Managing libraries effectively in CapCut helps keep your materials organized and your projects running smoothly. Here are some quick tips to help you stay on top of your content:
- Label Libraries Clearly: Give each library a name that reflects its purpose, such as Audio, Footage, or Effects. This will make it easier to find what you need quickly.
- Use Subfolders: Some versions of CapCut allow subfolders inside libraries. Organize materials by scenes, content type, or project stages to keep everything in order.
- Regular Cleanup: Periodically go through your libraries to delete unused or duplicate files. This helps free up space and keeps your project environment clutter-free.
- Avoid Overloading Libraries: Don’t add too many materials into a single library at once. If you have a large collection, consider creating multiple libraries for better management.
By staying organized and routinely managing your libraries, you’ll save time and reduce stress during your editing process.
How to Avoid the Need for Moving Materials in the Future
To minimize the need for moving materials in the future, it’s important to set up an organized system from the beginning. Here are a few quick tips to help:
- Plan Your Library Structure Early: Before adding content, decide how to categorize your materials. You can create separate libraries for each project or for different types of content like videos, audio, or images.
- Use Cloud or External Storage: For larger files, use cloud storage or an external SD card. This keeps your CapCut libraries light and makes it easier to manage space.
- Import Only What You Need: Avoid importing unnecessary files. Adding only the files you’ll actually use in a project helps prevent clutter.
- Label Libraries Clearly: Name your libraries with specific labels, such as Footage, Audio, or Final Edits, to make it easier to find what you need.
By keeping these practices in mind, you can reduce the need for frequent reorganizing and keep your materials neatly sorted right from the start.
Final Thoughts
Moving footage to another media library in CapCut may not be as intuitive as a simple drag-and-drop operation; however, by following the steps outlined in this guide, you can still manage your media assets efficiently. By performing operations such as exporting, creating new resource libraries, and organizing resources, you can ensure that your editing projects remain neat and organized, thereby improving work efficiency. With a little effort, you can avoid cluttering up materials and ensure a smooth workflow, which is especially important when dealing with large, complex projects.


