

Log format footage allows video creators to have better control over color and contrast during editing. Unlike standard video formats, Log footage tends to appear flatter, with paler colors and lower contrast during recording. This is completely normal. The purpose of recording in Log format is to retain more details in highlights and shadows, making it easier to perform custom color grading in post-production. Many creators who download CapCut APK for mobile editing use Log footage because it provides greater flexibility when adjusting colors, recovering details, and achieving a more professional visual style.
Many smartphones, cameras, and action cameras now support Log format recording. The good news is that you don’t need expensive desktop software to process log materials. CapCut Mobile has enough tools built in to directly transform ordinary footage into colorful, professional-quality videos on your phone.
We have talked about how you can color grade in CapCut before. This guide will walk you through the steps of color grading log footage in CapCut Mobile.
What Is Log Footage
Log footage is a special recording format designed to capture a wider range of light and color information than standard video profiles. Rather than applying strong contrast, saturation, and sharpening inside the camera, a Log profile records a flatter image that preserves more detail in both bright and dark areas. When editing Log clips in tools such as CapCut APK latest version, creators have greater flexibility to adjust exposure, contrast, and color balance while maintaining image quality and achieving a more professional final look.
When you first view the log footage, it may look dull, gray, or washed out. Colors are less vibrant, blacks appear lighter, and the overall image lacks the punch that viewers usually expect. This appearance is deliberate. The camera is storing as much visual information as possible so editors have greater flexibility during post-production.
Many modern devices support Log recording, including smartphones, mirrorless cameras, drones, and action cameras. Popular examples include Apple Log, Sony S-Log, Canon C-Log, Panasonic V-Log, and DJI D-Log. Although these formats have different names, they all serve the same purpose: giving creators more control over the final look of their videos.
Because Log footage retains extra highlight and shadow detail, it is particularly useful for scenes with challenging lighting conditions, such as sunsets, bright outdoor environments, city lights at night, or indoor locations with strong window light. After recording, editors can use tools in apps like CapCut Mobile to restore contrast, enhance colors, and create a specific visual style that matches their project. This extra flexibility is one of the main reasons why Log recording has become increasingly popular among content creators, filmmakers, and mobile videographers.
Why Color Grade Log Footage
Log footage is designed to capture a wider range of light and color information than standard video profiles. To achieve this, the camera reduces the contrast and saturation of the image, so Log footage usually appears flat and dull when viewed directly. While it may not seem very appealing at first glance, it offers greater flexibility for post-production. For creators learning how to edit videos with CapCut APK, Log footage provides more room to adjust exposure, colors, highlights, and shadows, making it easier to achieve a polished and professional-looking final result.
Color correction can bring these hidden details back to the image. By adjusting contrast, exposure, and color, you can restore highlight and shadow details that may be lost in standard footage. This is especially useful when shooting scenes with complex lighting, such as sunsets, city lights, or bright outdoor environments.
Color grading also allows creators to better control their style. Whether you want to create a warm travel atmosphere, a clean business aesthetic, or a dramatic cinematic feel, Log materials can provide you with a flexible starting point to help you build your visual identity. You are not limited by the camera’s default colors, but can adjust the final image to better suit your content and audience.
Import Your Log Footage into CapCut
Start by creating a new project.
- Open CapCut Mobile.
- Tap New Project.
- Select your Log footage.
- Add clips to the timeline.
Before making any changes, play the footage and observe its current appearance.
Most Log clips will look flat and low in contrast at this stage.
Step 1: Adjust Exposure
The first step is balancing brightness.
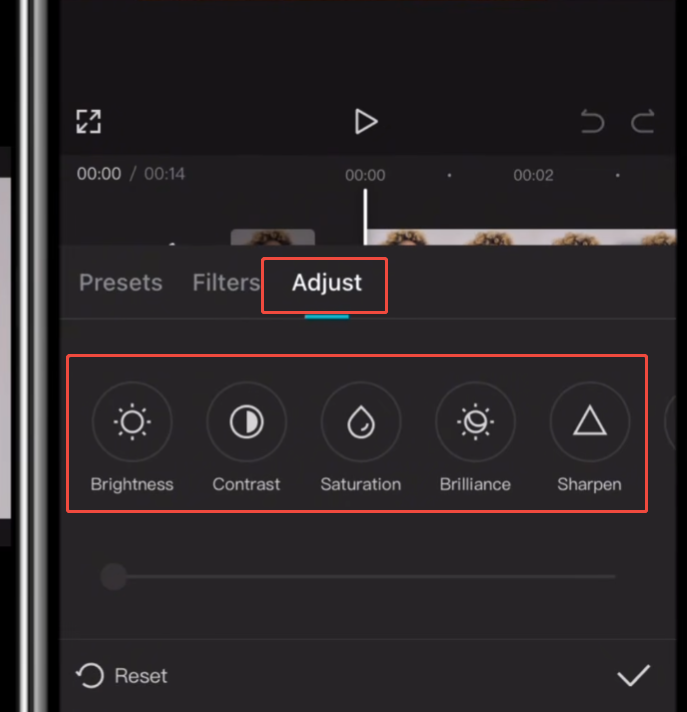
Select the clip and open the Adjust panel.
Focus on:
Exposure
Increase exposure if the image appears too dark.
Avoid making the footage excessively bright because highlighted details may become less visible.
Brightness
Brightness controls the overall light intensity.
Fine-tuning is usually more effective than making major adjustments.
Contrast
Gradually increase the contrast.
This helps to separate highlights and shadows, making the image look more natural.
At this point, the image should be clearer than the original Log recording.
Step 2: Recover Highlights and Shadows
One advantage of Log footage is the extra detail stored in bright and dark areas.
Use the following controls:
Highlights
If the highlight areas are too bright, please reduce the highlight ratio.
This can restore details of the sky, windows, clouds, or reflective surfaces.
Shadows
Increase shadows if dark areas conceal important details.
Be cautious not to lift shadows too much, or the image may appear flat again.
Blacks
Adjust the black level to enhance the depth of the image.
Slightly lowering the black level usually results in a cleaner, more professional visual effect.

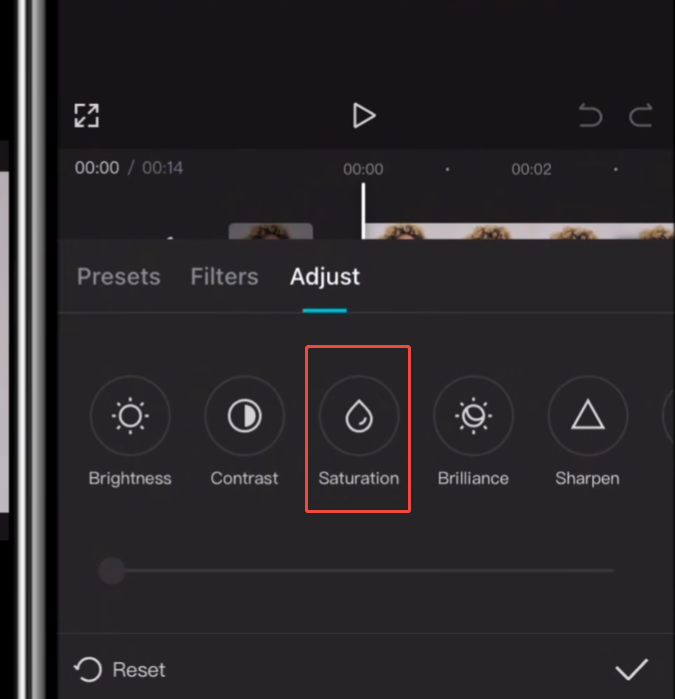
Step 3: Increase Saturation
Raw materials typically have very few colors.
Turn on the saturation control and gradually increase the saturation until the color looks natural.
Avoid over-increasing saturation; skin tones and objects will quickly become unrealistic.
A moderate increase in saturation is usually sufficient.
Vibrance
If available, vibrancy can improve colors with lower saturation without significantly affecting colors that are already highly saturated.
This usually produces a more balanced effect than adjusting the saturation alone.
Step 4: Correct White Balance
Incorrect white balance can make footage look too blue, orange, green, or magenta.
Use the following controls:
Temperature
- Increase the temperature for warmer colors
- Decrease the temperature for cooler colors
Tint
- Adjust toward green if the footage looks too magenta
- Adjust toward magenta if the footage looks too green
Look at neutral objects such as white walls, gray roads, or clouds when making these adjustments.
Proper white balance creates a more realistic image.
Step 5: Fine-Tune Color
After correcting exposure and white balance, begin refining colors.
Pay attention to:
- Skin tones
- Sky color
- Grass and plants
- Building colors
- Product colors
The goal is consistency.
If multiple clips are used in one project, try to keep colors similar throughout the entire video.
This helps create a smoother viewing experience.
Step 6: Use Filters as a Starting Point
CapCut includes built-in filters that can help speed up the grading process.
Instead of using a filter at full strength:
- Apply a filter.
- Reduce its intensity.
- Combine it with manual adjustments.
This approach often produces better results than relying entirely on presets.
Filters work best as a foundation rather than a final solution.
Step 7: Create a Cinematic Look
Once the footage looks natural, you can develop a specific visual style.
Popular approaches include:
Warm Cinematic Style
- Slightly warmer temperature
- Moderate contrast
- Rich but controlled saturation
Cool Modern Style
- Cooler temperature
- Stronger contrast
- Reduced warmth in highlights
Soft Lifestyle Style
- Lower contrast
- Brighter shadows
- Gentle color saturation
Different projects benefit from different looks, so experiment until the visuals match your content.
FAQs
1. Can CapCut Mobile edit Log footage?
Yes. CapCut Mobile includes tools for adjusting exposure, contrast, highlights, shadows, saturation, color temperature, and hue, allowing you to color grade log footage directly on your phone. While it may not have all the advanced features of professional desktop software, it is sufficient to deliver excellent results for most content creators.
2. Why does the Log footage look gray and washed out?
To retain more image information, the Log footage has reduced contrast and saturation during recording. This flattened visual effect is intentional, designed to provide greater flexibility for post-production color grading.
3. Do I need LUTs to color grade Log footage in CapCut?
No. LUTs can speed up workflows, but they are not necessary. Many creators also achieve excellent results by manually adjusting exposure, contrast, saturation, highlights, shadows, and white balance using CapCut’s built-in editing tools.
4. What is the first adjustment I should make when grading Log footage?
Most editors will first adjust the exposure and contrast. These adjustments help restore depth to the image, making the material look more natural, before color correction and creative color grading are performed.
5. Can I create a cinematic look with CapCut Mobile?
Yes. After restoring the video to a natural look, you can adjust the contrast, color temperature, shadows, and saturation to create different visual styles, including cinematic, travel, lifestyle, or business styles.
6. Is Log footage better than standard video profiles?
Log format footage retains more highlight and shadow details, thus offering greater flexibility during editing. However, it usually requires color correction to achieve the best results, while standard format footage can usually be used directly after recording.
Final Thoughts
Color grading Log footage in CapCut Mobile is much simpler than many creators imagine. Log video footage may appear somewhat flat, but this is not a problem; rather, it is an advantage because it retains more image information, making it easier to edit later. If you are using the latest CapCut APK Update, you can take advantage of improved editing tools and controls that help restore contrast, color, and detail more efficiently while maintaining a natural-looking result.
By carefully adjusting exposure, contrast, highlights, shadows, saturation, and white balance, you can transform dull Log clips into vibrant, professional videos. As you practice more, you will gradually develop your own color grading style and create a consistent visual identity across all your content.


