

CapCut is a popular video editing app loved by creators worldwide. Users can use it to edit short videos, add music, and share creative content online. In addition to editing features, CapCut also allows users to publish their work and share it with others. For beginners who want to understand how to post on CapCut mobile, the process becomes very easy after learning a few simple steps. Once you finish editing your video, you can quickly publish it to the CapCut community and let other users watch and interact with your content.
Create Your Video First
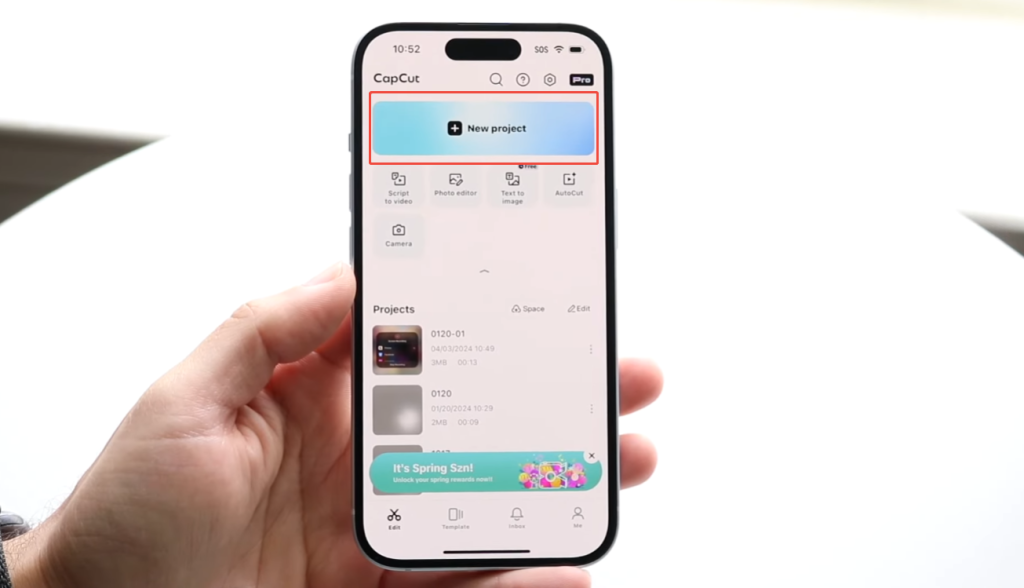
Before publishing your video on CapCut, the first step is creating and editing it. Open the app and tap “New Project” on the home screen. After that, you can select the photos or video clips you want to use from your phone. CapCut allows you to add multiple clips at once, making it easy to create longer videos.
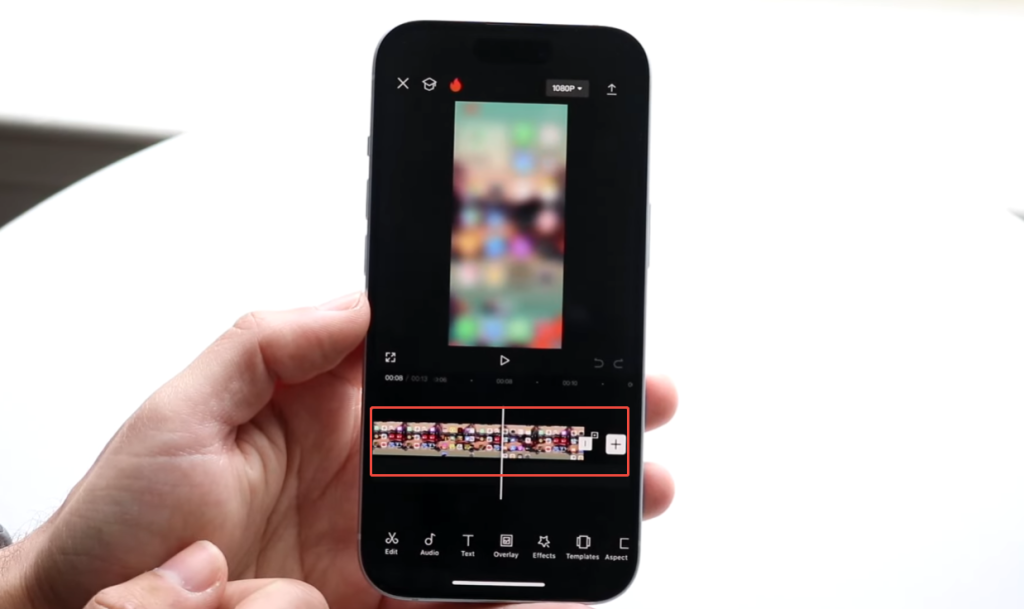
After importing the clip, you will see the timeline for editing. You can drag the clips left and right here to adjust their order. If a clip is too long, you can trim the beginning or end. This helps to remove unwanted parts, making the video concise, smooth, and easy to watch.
CapCut also offers many easy-to-use tools to optimize your videos. You can add filters to change the color style, insert text to explain the video content, or add stickers to make it more fun. Many users also add background music or sound effects to make the video more engaging. If you are editing on a computer and wondering how to post on CapCut for PC, the process is also simple once your project is ready. If your video contains multiple clips, you can add transition effects to make the transitions between clips smoother and more natural.
Preview Your Video
After finishing editing, always preview the entire video before publishing. Watching it from beginning to end helps you understand how the different parts connect. Sometimes, a clip that looks good during editing may feel too short or too long after watching the full video.
Pay attention to the transitions between clips. Check if the transitions are smooth and if the editing points are just right. If the scene transition is too abrupt, you can trim the clip again or add a simple transition to make it more natural.
You should also listen carefully to the background music and sound effects. Make sure the music starts and ends at appropriate points. If you have added sound effects or voice clips, please check that they are clear and that the volume is not disproportionate to the music.
Another area to check is text and stickers. Read the text on the screen and make sure it stays on the screen long enough for the audience to understand it. At the same time, check whether stickers, subtitles, or effects obscure important parts of the video.
Watch the video again to check the overall pacing and visual balance. Making small adjustments during the preview process can improve the final result, making the video look more polished before exporting and publishing.
Export the Video
Once your video is ready, the next step is to export it. Tap the “Export” button in the upper-right corner of the screen. CapCut will display several options for you to choose how to save the final video.
Choose your video resolution. Most users choose 1080p because it offers both clear image quality and a moderate file size. If your phone has limited storage space or the video is short, you can also choose 720p. For higher-quality projects, some users will choose a higher resolution if their device supports it.
You may see the frame rate option. A common choice is 30 frames per second, which works well for most social media videos. If your video contains fast-moving or action sequences, you can choose a higher frame rate for smoother playback.
After selecting these settings, tap “Export” again. CapCut will begin processing the video and convert your project into the final file. The time required depends on the video length, the number of effects used, and the performance of your device.

Post Directly from CapCut
CapCut lets you easily share your videos once you’ve finished editing. Once you’re finished with your project, tap the “Export” button, and the app will process the video and save it to your phone. After exporting, CapCut will typically display several sharing options on the screen. These options allow you to send videos directly to social media without having to open other apps first.
You can choose the platform where you want to publish your video. After selecting, the app will guide you to the publishing page. If you are learning how to post on CapCut for free, this step is simple and easy to follow. Here you can add a short title, write text about the video, or add hashtags. This step helps people understand your video content and may help more users find it.
Before publishing, it’s recommended that you watch the video again. Check if the sound is clear, if the text is displayed on time, and if the video quality is good. Once everything is fine, you can complete the publishing and upload process.
Publishing videos directly from CapCut saves time because you don’t need to export files and search for them in your album. Many creators prefer this method because it allows them to edit and share content in just a few steps. This method also helps streamline the workflow for users who frequently create and upload videos.
Post on the CapCut Community
CapCut is more than just a video editor; it also has a community where users can share their creations and browse videos made by other users. Many creators, including those who prefer editing on a desktop with tools like CapCut mod pc version, use the platform to publish their projects and get feedback from others. Posting videos on the CapCut community allows you to easily showcase your editing work and connect with people who share your passion for video creation.
After exporting your video, you can choose to share it within the CapCut app. The app allows you to upload videos and add short titles. The title can explain the content of the video, such as the theme, the music used, or the idea behind the editing.
When publishing videos, you can also add tags. Tags help organize videos and make them easier for other users to find. For example, you can use tags related to editing style, video theme, or trend. Your video is more likely to be seen when people search for or browse similar content.
Tips for Better Posts
If you want more people to notice your videos, these simple tips might help:
Keep your videos short and clear.
Use music that matches the atmosphere of your videos.
Add simple text descriptions to the theme.
Choose clips that tell a short story.
Release videos regularly to maintain a consistent style.
Many creators also follow current popular trends or editing styles. This helps their videos reach a wider audience.
Common Posting Mistakes
Some beginners make small mistakes when posting videos. For example, they might export a low-quality video or forget to preview the final edit. Some people may add too many special effects, making the video look cluttered and disorganized.
A clean and simple video usually works better than one with too many elements.
Sharing Your Videos with Confidence
Once you’ve mastered the basic steps, publishing videos on CapCut becomes much easier. After editing the video clip, previewing the effect, and exporting it, you can quickly share it to social media or the CapCut community. The entire process is designed to be simple and easy to understand, allowing both beginners and experienced users to easily publish content.
As you continue using CapCut, your editing speed will increase, and you’ll become more proficient with its various tools. Trying out new effects, music styles, or transitions can make your videos look even more exciting. Over time, subtle improvements in editing and storytelling skills will ultimately significantly increase the popularity of videos.
Regularly sharing videos can also help you develop your own style. Whether you’re posting short films, creative short videos, or simple everyday clips, CapCut lets you easily turn your ideas into videos and share them with others.


