

If you edit videos using CapCut PC, you may have noticed that video clips, audio, and text often automatically snap to other elements on the timeline. This feature, called “Snap,” is designed to help with alignment, but it’s not always effective. In fact, when you’re trying to make subtle, precise adjustments, turning CapCut PC snapping off becomes necessary, because the “Snap” feature can be more of a hindrance than a helpful tool.
In this guide, I will explain what the “Snap” feature does, how to turn it off in CapCut PC, and when it should be enabled. All content will be explained step by step in plain language.
What Is snapping in CapCut PC?
CapCut PC’s “Align” feature is a timeline alignment function that helps you automatically align clips with important points while editing. When alignment is enabled, CapCut gently “pulls” clips or playheads to specific positions on the timeline, allowing elements to align without precise mouse control.
Simply put, alignment acts like an invisible guideline within the CapCut magnetic timeline. When you drag a video clip, audio track, text layer, or image, CapCut detects nearby reference points and locks the clip in place when it’s close enough.
These reference points typically include:
The beginning or end of another clip
The beginning of a playout
The edges of text, audio, or overlay elements
Sometimes also include markers or key editing points
This feature helps you easily create clean, crisp clips and avoid small gaps or overlaps that could cause playback problems.
Why You Might Want to Turn Snapping Off
While the alignment feature is useful, it is not suitable for all editing scenarios. As projects become more complex, you may find that alignment features can sometimes slow you down.
One common problem is precision. When alignment is enabled, clips often jump to nearby edges, markers, or playheads. This makes it difficult to place the clip precisely where you need to, especially when you only need to adjust a few frames of time. Even when using CapCut PC shortcut keys to move or nudge clips on the timeline, alignment snapping can override manual control. For music editing, even tiny time shifts can look unnatural, and alignment features can hinder these fine-tuning adjustments.
Another reason is audio editing. When working with sound effects, narration, or background music, you often need to freely slide audio clips to match natural pauses or beats. Alignment features can force audio to lock onto visual elements, which may look neat on the timeline but sound unnatural during playback.
Alignment can also interfere with caption and text animation. Text layers often require fine and iterative adjustments to time and position. With alignment enabled, each movement can pull the text back to other clips, making the process slower and more frustrating than necessary. For more advanced editing, such as fast cuts, rhythmic videos, or overlays, alignment features can reduce your sense of control. The timeline no longer responds smoothly to mouse movements as it used to; instead, it appears stiff, which disrupts the editing process and affects your focus.
In short, turning off the alignment feature gives you greater freedom and higher precision. You can decide the position of the elements yourself, instead of letting the software make the decision for you. Many experienced editors don’t completely turn off alignment features. They simply turn them off when precise manipulation is needed and re-enable them when alignment is required.
How to Turn Off Snapping in CapCut PC
CapCut PC version makes screen capture easy to control, but if you’re new to the desktop version, this option may not always be so obvious. For users looking for practical CapCut PC workflow tips, it’s important to know that the image capture function is managed directly on the timeline, rather than in the regular settings menu, which is why many users miss it at first.
Please follow these steps to properly disable this feature.
Step-by-Step Guide
Open CapCut PC and load your project
Snapping controls only appear when the timeline is active, so make sure at least one clip is added to your project.
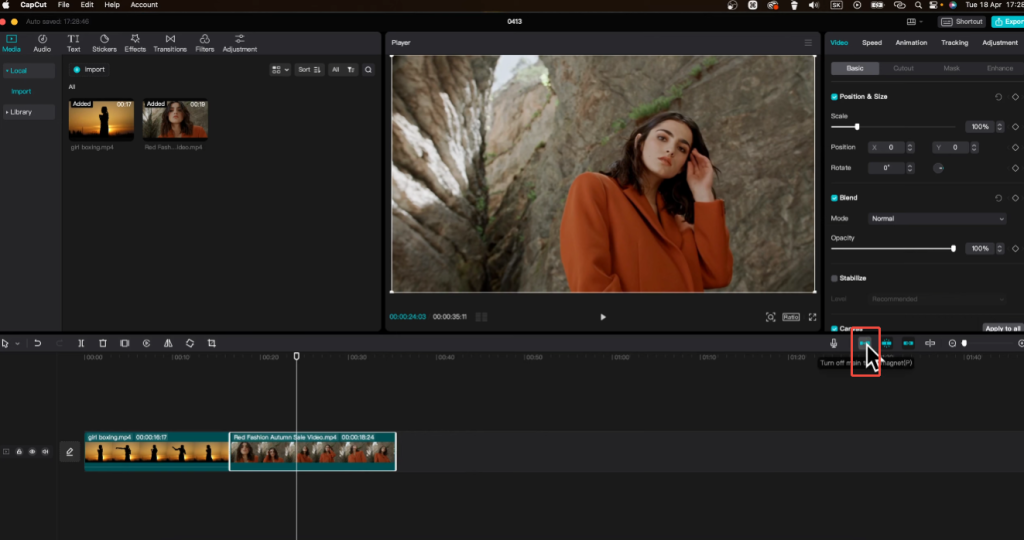
Focus on the timeline area
Look just above the video and audio tracks. This toolbar contains several small icons related to timeline behavior.
Find the magnet icon
The magnet icon represents snapping. It’s usually located near options like timeline zoom or track controls.
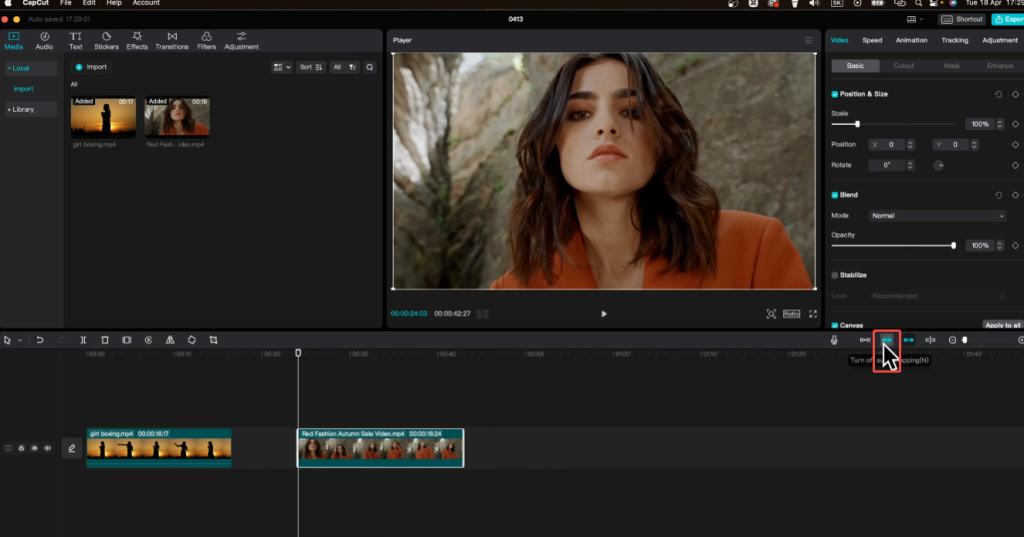
Click the magnet icon once
When the icon is highlighted, snapping is enabled
When the icon turns gray or becomes inactive, the snapping function is turned off.
The change takes effect immediately, for there’s no need to save or restart.
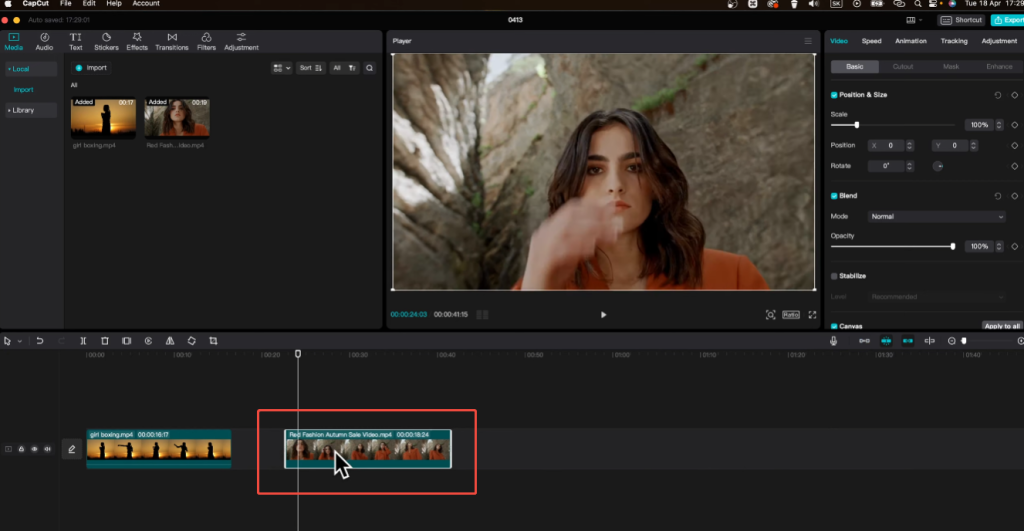
Test the result
Slowly drag the clip along the timeline. If the alignment feature is turned off, the clips will move freely without jumping to other clips or the playhead.
Turning Snapping Back On
Snapping isn’t a permanent setting. You can turn it back on anytime by clicking the magnet icon again. Many editors switch snapping on and off several times during a single project, depending on what they’re working on.
For example:
“Snapping on” for rough cuts and alignment
“Snapping off” for detailed timing and fine edits
If Snapping Still Feels Active
If the clip still stutters after disabling the magnet icon, please try the following quick check:
Make sure you click the correct icon and that the icon is not selected.
Check if the clips are grouped; grouped clips may feel “locked.”
Zoom in on the timeline for more precise control.
If the interface does not update correctly, please restart CapCut PC.
These problems are rare, but they may occur on certain systems.
How to Know If Snapping Is Off
Sometimes it can be difficult to determine if the capture feature is truly disabled, especially if you’re new to CapCut PC or need to switch between different projects. When following a CapCut timeline settings tutorial, these situations are quite common. Here are some clear ways to confirm whether the capture function is turned off.
1. Check the Magnet Icon State
The fastest and most reliable method is to look at the magnet icon above the timeline.
Snapping ON: the magnet icon is highlighted or colored
Snapping OFF: the magnet icon appears gray or inactive
If the icon looks active, snapping is still enabled. Even if clips seem to move freely at first.
2. Drag a Clip Near Another Clip’s Edge
With snapping turned off, clips behave very differently.
Try this test:
Drag a clip slowly toward the edge of another clip
If snapping is off, the clip will not jump or lock into position
You’ll be able to place it slightly before or after the other clip
When snapping is enabled, clips will automatically snap to the nearest edge when they are close to it.
3. Move a Clip Across the Playhead
The playhead is one of the strongest snapping points in CapCut.
With snapping off, you can move a clip past the playhead smoothly
The video clip will not be suddenly pulled to the playback head.
If the video clip is always precisely snapped to the playback head, the snapping function remains active.
4. Look for Frame-Level Movement
Snapping often prevents very small adjustments.
When snapping is disabled:
Tiny mouse movements result in tiny position changes
You can adjust clips by just a few frames
Fine audio timing becomes much easier
If every movement feels “locked” or overly precise, snapping may still be on.
5. Test with Text or Audio Clips
Snapping behavior is especially noticeable with subtitles and sound effects.
Move a text layer slightly along the timeline
Try adjusting a short sound effect
If both elements slide freely without locking to other clips, snapping is fully off.
6. Restart CapCut If Behavior Feels Inconsistent
In rare cases, the CapCut interface may not accurately reflect the current capture status.
If you’re unsure:
Save your project
Restart CapCut PC
Recheck the magnet icon before continuing
This ensures the snapping setting is properly applied.
When You Should Keep Snapping On
While the snap feature may feel somewhat limiting when performing detailed editing, in many cases, enabling it can actually save time and reduce errors. Understanding when to use the snap feature is one of the keys to using CapCut PC effectively.
1. Basic Clip Arrangement and Rough Cuts
When assembling the clips for the first time, pressing down helps ensure a secure connection without gaps. This is especially useful for:
Creating a rough cut
Lining up multiple short clips
Making sure scenes flow continuously
Without snapping, it’s easy to leave tiny gaps that cause unexpected black frames or audio dropouts.
2. Aligning Clips to the Playhead
Snapping makes it easy to place clips exactly at the current playhead position. This is helpful when:
Edit clips at specific moments
Insert auxiliary shots at precise times
Add sound effects synchronized with the action
Instead of zooming in and adjusting manually, snapping pulls the clip directly into place.
3. Syncing Audio and Video Quickly
For basic audio synchronization, the alignment feature is very effective. It can help align:
Narration with video clips
Background music with scene start
Sound effects with visual motion
If you don’t need frame-level precision, the alignment feature can improve speed and keep everything in order.
4. Working With Markers and Simple Timing Points
When using timeline markers or clear cut points, snapping ensures that clips lock directly to those reference points. This is useful for:
Following a simple beat or rhythm
Placing text at consistent intervals
Structuring educational or explainer videos
Snapping helps maintain consistency without constant zooming and manual checking.
5. Friendly Editing Workflows
For users who are new to CapCut PC, snapping reduces common editing errors. It helps prevent:
Overlapping clips by accident
Misaligned audio tracks
Uneven spacing between elements
Many beginners benefit from leaving snapping on until they become more comfortable with the timeline.
6. Fast Turnaround Projects
If speed matters more than fine detail, such as social media edits, quick promos, or drafts, snapping helps you move faster. You can focus on storytelling and pacing instead of precise positioning.
Final Tip
Many experienced editors don’t choose to enable or disable auto-alignment, but rather switch flexibly depending on the task at hand. They enable auto-alignment for cuts that require clear structure and speed, and disable it when precise editing is needed.
Common Problems and Fixes
Snapping icon missing
Make sure your timeline panel is fully expanded. On smaller screens, icons may be hidden.
Clips still snapping after disabling
Restart CapCut PC and reload the project. Rare UI glitches can cause settings to lag.
Audio snapping but video not
Check that you’re editing on the correct track and not locked to a grouped clip.
Final Thoughts
Snapping in CapCut PC is neither good nor bad by itself. It simply depends on how you edit. For quick cuts and basic alignment, snapping can save time and reduce mistakes. But when your work requires precision, especially with audio timing, subtitles, or fast visual transitions, snapping can easily get in the way.
Learning when to turn snapping off is part of developing better editing habits. Many experienced editors don’t leave it permanently enabled or disabled. Instead, they treat snapping as a tool they switch on only when it truly helps. This small change in workflow can make CapCut feel much more responsive and less restrictive.
If you often feel like the timeline is “fighting back” when you move clips, snapping is usually the reason. Turning it off gives you direct control over every frame and every sound cue, which is essential for clean, professional-looking edits.
In the end, mastering CapCut PC isn’t about knowing every feature, which means it’s about understanding how each feature affects your workflow. Snapping is one of those features that becomes powerful only when you use it intentionally.


